Create awesome Wifi Chat with Captive Portal using NodeMcu ESP8266
February 10th, 2019 by cedcraftscodes

In this tutorial, you will learn how to create a wifi chat with a captive portal using NodeMcuESP8266. You will also learn how to read and write to files in NodeMcu SPIFFS and to serve a web server.
Video Demonstration
Requirements
NodeMcu ESP8266
Arduino IDE
Arduino ESP8266 filesystem uploader
Download the Source Code Here:
ChatApp with Captive Portal Node Mcu Source Code (3049 downloads)
Environment Setup
We need to add NodeMcu ESP 12 to our Arduino IDE. Open up your IDE then go to “File -> Preferences” or simply hit “Ctrl + comma”
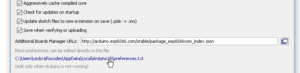
Paste http://arduino.esp8266.com/stable/package_esp8266com_index.json in additional board manager URLs.
Go to “Tools -> Board -> Boards Manager” search and install esp8266


Close and restart your Arduino IDE
Plug in your NodeMcu to your computer.
Selecting Port and Board
Go to Tools -> Port and select the COM Port of your NodeMCU. If you are not sure what port your NodeMcu is plugged in, go to Device Manager -> Ports (COM & LPT)

Now select NodeMcu 1.0 (ESP-12E Module) by clicking Tools -> Board. Scroll down until you find it.
Arduino ESP8266 Filesystem Uploader
Download Arduino ESP8266 Filesystem Uploader (direct link) Unpack the tool in your sketchbook directory (the path will look like <sketchbook directory>/tools/ESP8266FS/tool/esp8266fs.jar).

Restart your Arduino IDE (If opened). You will notice an option in Tools drop down. (ESP8266 Sketch Data Upload)

If you want to learn more about the NodeMCU File System. You can visit this documentation. Arduino File System
Source Code
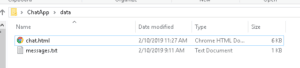
Unpack the downloaded source code. You will notice the data folder. This is where we will put all codes/files that we want to upload to the file system.
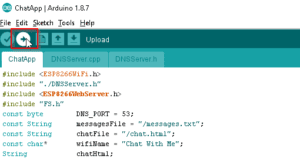
Open the ChatApp.ino into your Arduino IDE.
The first thing you should do is to upload the HTML file and messages.txt in your File System.
Go to Tools -> and click (ESP8266 Sketch Data Upload). Uploading the file may take awhile.
After uploading the file. Upload the ChatApp.ino. The code will compile and will be uploaded to your NodeMcu.
Connect to your WIFI. Notice that a notification, sign in to Wifi Network appears. This is the default behavior of android when connected to wifi with a captive portal.

Now try chatting. The design is responsive so you do not need to worry about its appearance.

To delete the messages. Simply double click the Chat App header. Click the red button that says “Delete Messages”.
You can also change your user name.
Code Explanation
|
1 2 3 4 5 6 7 8 9 10 11 12 13 14 15 16 17 18 19 20 21 22 23 24 25 26 27 28 29 30 31 32 33 34 35 36 37 38 39 40 41 42 43 44 45 46 47 48 49 50 51 52 53 54 55 56 57 58 59 60 61 62 63 64 65 66 67 68 69 70 71 72 73 74 75 76 77 78 79 80 81 82 83 84 85 86 87 88 89 90 91 92 93 94 95 96 97 98 99 100 101 102 103 104 105 106 107 108 |
//Include wifi library, filesystem and DNSServer for our Captive Portal #include <ESP8266WiFi.h> #include "./DNSServer.h" #include <ESP8266WebServer.h> #include "FS.h" const byte DNS_PORT = 53; const String messagesFile = "/messages.txt"; //The messages will be store here. const String chatFile = "/chat.html"; //This is our HTML file with javascript const char* wifiName = "Chat With Me"; /This is your wireless AP name. String chatHtml; //You can type this IP in your Browser. IPAddress apIP(10, 10, 10, 1); DNSServer dnsServer; ESP8266WebServer webServer(80); void setup() { Serial.begin(115200); SPIFFS.begin(); WiFi.mode(WIFI_AP); WiFi.softAPConfig(apIP, apIP, IPAddress(255, 255, 255, 0)); WiFi.softAP(wifiName); dnsServer.start(DNS_PORT, "*", apIP); chatHtml = fileRead(chatFile); //Read our HTML file that will be served webServer.begin(); //Start our web server setupAppHandlers(); handleSendMessage(); showChatPage(); } //Check if the request has data with a message name. //Write to our messages.txt file. //Send a response back to our request. Access-Control-Allow-Origin * is added to allow Cross-Origin Resource Sharing void handleSendMessage() { if (webServer.hasArg("message")) { String message = webServer.arg("message"); fileWrite(messagesFile, message + "\n" , "a+"); webServer.sendHeader("Access-Control-Allow-Methods", "POST,GET,OPTIONS"); webServer.sendHeader("Access-Control-Allow-Origin", "*"); webServer.send(200, "text/plain", "Message Sent"); } } //Delete the messages.txt file in our file system and send back a response to our request. void handleClearMessages() { SPIFFS.remove(messagesFile); webServer.sendHeader("Access-Control-Allow-Methods", "POST,GET,OPTIONS"); webServer.sendHeader("Access-Control-Allow-Origin", "*"); webServer.send(200, "text/plain", "File Deleted"); } //Display our chat page to our users void showChatPage() { webServer.send(200, "text/html", chatHtml); } //read messages.txt and send it back to users. void showMessages() { String messages = fileRead(messagesFile); webServer.sendHeader("Access-Control-Allow-Methods", "POST,GET,OPTIONS"); webServer.sendHeader("Access-Control-Allow-Origin", "*"); webServer.send(200, "text/plain", messages); } void setupAppHandlers() { webServer.onNotFound([]() { //ON 404 page not found, show our chat page. showChatPage(); }); //When our browser send request to this url, it will trigger the action defined in our method. webServer.on("10.10.10.1", showChatPage); webServer.on("/sendMessage", handleSendMessage); webServer.on("/readMessages", showMessages); webServer.on("/clearMessages", handleClearMessages); } //Method that reads the file stored in SPIFFS and return a string String fileRead(String name) { String contents; int i; File file = SPIFFS.open(name, "a+"); for (i = 0; i < file.size(); i++) { contents += (char)file.read(); } file.close(); return contents; } //Method to write text in a text file void fileWrite(String name, String content, String mode) { File file = SPIFFS.open(name.c_str(), mode.c_str()); file.write((uint8_t *)content.c_str(), content.length()); file.close(); } //Handle requests void loop() { dnsServer.processNextRequest(); webServer.handleClient(); } |
Chat.html
|
1 2 3 4 5 6 7 8 9 10 11 12 13 14 15 16 17 18 19 20 21 22 23 24 25 26 27 28 29 30 31 32 33 34 35 36 37 38 39 40 41 42 43 44 45 46 47 48 49 50 51 52 53 54 55 56 57 58 59 60 61 62 63 64 65 66 67 68 69 70 71 72 73 74 75 76 77 78 79 80 81 82 83 84 85 86 87 88 89 90 |
<script> var username; openModal("myModal"); // Function that append message to our UL tag. function appendToMessages(message) { var ul = document.getElementById("messages"); var li = document.createElement("li"); li.appendChild(document.createTextNode(message)); li.setAttribute("id", "element4"); ul.appendChild(li); } //Function that set the user name. function setName(name) { username = document.getElementById("userId").value; closeModal("myModal"); startReadingMessages(); } //Function to close the modals (Select Username. Delete messages window) function startReadingMessages() { setInterval(function () { readMessages(); }, 1500); } function closeModal(modalId) { var modal = document.getElementById(modalId); modal.style.display = "none"; } //Function to open the modals (Select Username. Delete messages window) function openModal(modalId) { var modal = document.getElementById(modalId); modal.style.display = "block"; } // Send HTTP Post request to our server with the our message. function sendMessage() { var messageBox = document.getElementById("m"); var message = username + ": " + messageBox.value; xhr = new XMLHttpRequest(); xhr.open('POST', 'http://10.10.10.1/sendMessage'); xhr.setRequestHeader('Content-Type', 'application/x-www-form-urlencoded'); xhr.onload = function () { if (xhr.status === 200) { messageBox.value = ''; readMessages(); } else if (xhr.status !== 200) { alert('Request failed. Returned status of ' + xhr.status); } }; xhr.send(encodeURI('message=' + message)); } //Send request to our web server to fetch the messages and add it in a list. function readMessages() { var xhr = new XMLHttpRequest(); xhr.open('GET', 'http://10.10.10.1/readMessages'); xhr.onload = function () { if (xhr.status === 200) { document.getElementById("messages").innerHTML = ''; var msgArr = xhr.responseText.toString().replace(/\n$/, "").split(/\n/); msgArr.forEach(function (entry) { appendToMessages(entry); }); } else { alert('Request failed. Returned status of ' + xhr.status); } }; xhr.send(); } // Send request to our server to delete the messages function clearMessages() { var xhr = new XMLHttpRequest(); xhr.open('GET', 'http://10.10.10.1/clearMessages'); xhr.onload = function () { if (xhr.status === 200) { closeModal("deleteModal"); } else { alert('Request failed. Returned status of ' + xhr.status); } }; xhr.send(); } </script> |
Related Posts

Publishing Java SpringBoot Library in JitPack

Deploy React Application in Netlify

MFRC522 RFID Read and Write Data in Specific RFID Block

Create a BadUSB Rubber Ducky using Arduino

Social Media Phishing with Captive Portal using NodeMcu

Scan WordPress site Vulnerabilities using WPScan


Comments
5 Comments
Leave a Reply
Recent Posts

yugan
January 4, 2020 at 2:40 aminstead of wifi we can use lora modules by interfacing them in urat pins
Widya Febriandaru
October 7, 2020 at 3:28 pmbro can u tell me how we attach lora modules to this project? can u share the script?
Keith
February 13, 2020 at 6:42 pmThis is almost exactly what I have been trying to get my ESP to do: I can see massive potential for self contained chat portals.
The challenge now is of whether we can run a full bulletin board on an ESP…
Keith
February 13, 2020 at 9:00 pmDo you think it would be difficult to have the ESP recognise visitors by (I guess) their MAC address?
Andrew
April 4, 2021 at 8:11 pmmerci pour ce tutoriel.