Connecting RFID Scanner to PHP using NodeMcu Wifi Module
January 29th, 2019 by cedcraftscodes

In this tutorial, we will learn how to connect your RFID RC522 to your PHP Apps with the use of NodeMcu ESP12.
This tutorial covers how to set up the RFID. You will also learn how to connect RFID to PHP and insert data to Mysql database.
Video Demonstration
Requirements
NodeMcu Wifi Module
RFID-RC522
Arduino RFID Library for MFRC522 (SPI)
Arduino IDE
Arduino Core for NodeMCU ESP-12E Using Arduino Boards Manager
Led Lights
220 Ohm to 1000 ohm resistor
Jumper Wires
XAMPP
Download Sourcecode here:
NodeMcu,RFID, PHP Source Code (9831 downloads)
After preparing the requirements, connect your RFID RC522 to your NodeMcu. Follow the diagram below.
Connection

| RFID | NodeMcu |
| 3.3V | 3.3V |
| RST | D2 |
| GND | GND |
| MISO | D6 |
| MOSI | D7 |
| SCK | D5 |
| SDA | D4 |
The Yellow light will serve as an indicator that we have successfully connected to wifi. Green indicates that the request to the server has been sent successfully. Red light indicates that our HTTP request failed / our server did not return “success”.
| Led Pin | NodeMcu |
| Led w/ 220ohm Resistor (Red) | D0 |
| Led w/ 220ohm Resistor (Green) | D1 |
| Led w/ 220ohm Resistor (Yellow) | D8 |
Setting up Arduino and adding RFID Library
We need to add esp8266 to our Arduino IDE. Open up your IDE then go to “File -> Preferences” or simply hit “Ctrl + comma”
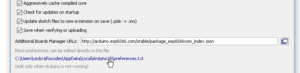
Paste http://arduino.esp8266.com/stable/package_esp8266com_index.json in additional board manager URLs.
Go to “Tools -> Board -> Boards Manager” search and install esp8266


Close and restart your Arduino IDE
Plug in your NodeMcu to your computer. You will notice that your RFID scanner will light up.
Selecting Port and Board
Go to Tools -> Port and select the COM Port of your NodeMCU. If you are not sure what port your NodeMcu is plugged in, go to Device Manager -> Ports (COM & LPT)

Now select NodeMcu 1.0 (ESP-12E Module) by clicking Tools -> Board. Scroll down until you find it.
Extracting MFRC522 Library
Extract the MFRC522 library to your Arduino Libraries folder. The libraries folder is located in C:\Program Files (x86)\Arduino. (Assuming it is the installation path of your Arduino IDE).
Restart your Arduino IDE
Modifying the Codes
Open up the codes attached in Arduino IDE. Change the following lines of code.
Since our RFID Scanner will be wireless, we need a way to transmit the data to our web server. Our NodeMcu will automatically connect to your wifi.
|
1 2 |
const char *ssid = "yourwifiname"; const char *password = "yourwifipassword"; |
We will send the decimal value of our card uuid to our server by sending a POST request. The URL must be changed to where you deployed our PHP codes. I run XAMPP on my computer. I inputted my LAN IP address.
|
1 2 |
String postData = "cardid=" + String(cardId) + "&action=insertRfIdLog"; http.begin("http://192.168.0.10/rfid/log.php"); |
In our connect.php file in RFID folder. Change the following database credentials.
|
1 2 3 4 |
$servername = "localhost"; $username = "root"; $password = ""; $dbname = "rfid"; |
After modifying the codes, plugin your NodeMCU, and on Arduino ID, click the upload button.
Deploying our PHP Web App
Start your Apache and Mysql in XAMPP Control Panel. Copy paste the rfid folder provided in your htdocs folder. Create a new database named rfid in your PHPMyAdmin. Import the rfid.sql file. If you do not know how to import an SQL file in PHPMyAdmin, simply click on your database, click “Import -> Choose File -> Click rfid.sql -> Open -> Go”

If you have done the steps above properly, you should be able to see the logs in http://localhost/rfid/viewlogs.php
That’s it. Enjoy.
Hope you like this tutorial. Please share the love by clicking the social media buttons!
Related Posts

Publishing Java SpringBoot Library in JitPack

Deploy React Application in Netlify

MFRC522 RFID Read and Write Data in Specific RFID Block

Create a BadUSB Rubber Ducky using Arduino

Social Media Phishing with Captive Portal using NodeMcu

Scan WordPress site Vulnerabilities using WPScan


Comments
60 Comments
Leave a Reply
Recent Posts

hemangi
March 31, 2019 at 10:52 pmunable to post the data to xampp ,showing the result -1 http.POST(postData);
cedcraftscodes
April 13, 2019 at 9:17 amMay I see your codes? Make sure your NodeMCU is connected to the same network your xampp is running.
You may also need to add grant access to all by editing your xampp httpd-conf file.
Tutorial for granting access here https://stackoverflow.com/questions/21161908/new-xampp-security-concept-access-forbidden-error-403-windows-7-phpmyadmin
Thasni.s.r
December 8, 2019 at 1:09 amshowing result -1.i’m using xampp on windows 10
Erick Del Mundo
April 19, 2019 at 10:24 pmHi how can I send an alert message using javascript instead of digitalWrite(CONN_PIN, HIGH); and digitalWrite(CONN_PIN, LOW); either success or failed? I mean something like this:
function insertRfIdLog() {
include ‘connect.php’;
$cardid = $_POST[‘cardid’];
$time = time();
$stmt = $conn->prepare(“INSERT INTO
tbllogs(cardid,logdate) VALUES (:card, :dt)”);$stmt->bindParam(“:card”, $cardid);
$stmt->bindParam(“:dt”, $time);
$stmt->execute();
//ON THIS PART, this one below is only printing in Serial Monitor
echo “alert(‘Successfully login’);”;
}
cedcraftscodes
April 19, 2019 at 10:57 pmHello Erick,
The log is fetched every x seconds using AJAX.
$(document).ready(function(){
function showData()
{
$.ajax({
url: 'log.php',
type: 'POST',
data: {action : 'showLogs'},
dataType: 'html',
success: function(result)
{
$('#logs').html(result);
},
error: function()
{
alert("Failed to fetch logs!");
}
})
}
//Fetch rfid logs in database every 2.5 seconds
setInterval(function(){ showData(); }, 2500);
});
You may need to store the size of the current logs. When a new request to fetch the rfids in database is sent to your web server, compare the count of current logs to the new one..
If you need to have “real-time” events, you may need to use Websockets in Javascript. *you can use Socket.io to publish events.
cedcraftscodes
April 19, 2019 at 10:57 pmHello Erick,
The log is fetched every x seconds using AJAX.
$(document).ready(function(){
function showData()
{
$.ajax({
url: 'log.php',
type: 'POST',
data: {action : 'showLogs'},
dataType: 'html',
success: function(result)
{
$('#logs').html(result);
},
error: function()
{
alert("Failed to fetch logs!");
}
})
}
//Fetch rfid logs in database every 2.5 seconds
setInterval(function(){ showData(); }, 2500);
});
You may need to store the size of the current logs. When a new request to fetch the rfids in the database is sent to your web server, compare the count of current logs to the new one..
If you need to have “real-time” events, you may need to use Websockets in Javascript. *you can use Socket.io to publish events.
Erick Del Mundo
April 20, 2019 at 10:24 amHi CEDCRAFTSCODES, Thank you very much for the quick reply, I understand that the viewlogs.php refreshes every 2.5 seconds to fetch the data from the mysql database using Jquery Ajax. But is there a way aside of setting “error pin” to high to give an alert message in the browser like alert(‘Unable to login’); I’m looking into websockets now but it will be a great help for me if you can teach me that part 🙂 So far this is what I’ve try but not working for me:
function insertRfIdLog() {
include ‘connect.php’;
$cardid = $_POST[‘cardid’];
$time = time();
$stmt = $conn->prepare(“INSERT INTO
tbllogs(cardid,logdate) VALUES (:card, :dt)”);$stmt->bindParam(“:card”, $cardid);
$stmt->bindParam(“:dt”, $time);
$stmt->execute();
//This part prints only in the Serial Monitor but no output in the browser, I’m trying this as an alternative to Success Pin
High or Error Pin High:
if ($stmt) {
echo “alert(‘Successfully login’);”;
}
else {
echo “alert(‘Successfully login’);”;
}
}
cedcraftscodes
April 20, 2019 at 10:43 amHi Erick,
For the logic, the NodeMCU device sends an HTTP post request to the server. The server will then return a response, which will then be read by NodeMcu device which in our case, the “success” message. I don’t think that PHP is enough to cater to what you are trying to accomplish. You may want to look into NodeJS and Socket io. The logic would be, your wifi module will send a message to the server. The server will then broadcast a message to your client to display alert / whatever operations you may need.
https://socket.io/docs/#Sending-and-getting-data-acknowledgements
Thanks,
Cedric
Erick Del Mundo
April 20, 2019 at 11:00 amThanks for info Cedric, I understand now that the NodeMCU only sends POST or GET request to the server. But is there other way to send a message in the browser without websocket and node.js? I’m looking to server.send() that I found here: https://techtutorialsx.com/2016/10/15/esp8266-http-server-serving-html-javascript-and-css/ , I wonder if you could help me to integrate that in your code? Because I’m getting error what I tried this code:
const char * javascriptCode = ” “
“ “
“ “
“”
” alert(\”Hello from the ESP8266!\”); “
“”
“ “
“ “;
server.on(“/javascript”, []() { //Define the handling function for the javascript path
server.send(200, “text/html”, javascriptCode);
});
Thank you again
Erick Del Mundo
April 20, 2019 at 11:04 amLooks like WordPress is not allowing me to post script tags that’s why its blank like ” “
cedcraftscodes
April 20, 2019 at 11:07 amWhere do you want to see the alert? Upon checking the link, the NodeMCU in the tutorial works as a web server, not an HTTP client. If you are into a web server, I have a tutorial about chat app which will teach you how to set up your own web server (Your NodeMCU will act as a web server). Visit this link. https://devcraze.com/tutorials/internet-of-things/create-awesome-wifi-chat-with-captive-portal-using-nodemcu-esp8266/
But if you want to post it in a browser using your PHP codes, your best bet was to use “Polling” / sending request every second……
Erick Del Mundo
April 20, 2019 at 12:51 pmThank you Cedric, I really appreciate your quick response and help 🙂 I’ll take a look at your other tutorial, but to explain further this what I’m doing with your tutorial above, I modified it, what I’m trying to do is to register each RFID card to a single unique person every time they swipe their card. So whenever the person try to swipe twice, there will be an alert message of “RFID card exist, unable to register duplicated card”, so in your PHP code that I modified I tried this and also this is the part I want to have an alert message instead of making the led light set to high or low:
if ($stmt) {
echo “alert(‘Card was successfully registered!’);”;
}
else {
echo “alert(‘RFID card exist, unable to register duplicated card!’);”;
}
BUT what’s happening is those messages are only printing in the serial monitor and not in the browser?
AND also if I’m going to click the OK button from the alert message the page will automatically refresh without adding this setInterval(function(){ showData(); }, 2500); in viewlogs.php. because I’m using bootstrap modal to enter the username of the person
Here’s the screenshot of what I’m trying to do: https://imgur.com/0qxKv8d
Thank you again
evanz1234
August 2, 2019 at 11:13 amGoodmorning ced, I have encountered these errors in your arduino codes.
:\Users\User\AppData\Local\Arduino15\packages\esp8266\hardware\esp8266\2.0.0\libraries\ESP8266HTTPClient\src/ESP8266HTTPClient.h:84:9: error: ‘WiFiClient’ does not name a type
WiFiClient & getStream(void) __attribute__ ((deprecated)) ;
^
C:\Users\User\AppData\Local\Arduino15\packages\esp8266\hardware\esp8266\2.0.0\libraries\ESP8266HTTPClient\src/ESP8266HTTPClient.h:85:9: error: ‘WiFiClient’ does not name a type
WiFiClient * getStreamPtr(void);
^
C:\Users\User\AppData\Local\Arduino15\packages\esp8266\hardware\esp8266\2.0.0\libraries\ESP8266HTTPClient\src/ESP8266HTTPClient.h:97:9: error: ‘WiFiClient’ does not name a type
WiFiClient * _tcp;
^
C:\Users\User\AppData\Local\Arduino15\packages\esp8266\hardware\esp8266\2.0.0\libraries\ESP8266HTTPClient\src/ESP8266HTTPClient.h:98:9: error: ‘WiFiClientSecure’ does not name a type
WiFiClientSecure * _tcps;
^
Multiple libraries were found for “MFRC522.h”
Used: C:\Users\User\Documents\Arduino\libraries\MFRC522
Not used: C:\Users\User\Documents\Arduino\libraries\arduino_857547
Not used: C:\Users\User\Documents\Arduino\libraries\MFRC522-1.4.3
exit status 1
Error compiling for board NodeMCU 1.0 (ESP-12E Module).
cedcraftscodes
August 3, 2019 at 11:39 amInstall the lower version of esp8266 in your board manager.
Multiple libraries were found for “MFRC522.h”
Please remove duplicating RFID libraries in your Arduino and re upload the codes again.
Erick Del Mundo
April 20, 2019 at 10:43 amMy mistake it was:
if ($stmt) {
echo “alert(‘Successfully login’);”;
}
else {
echo “alert(‘Unable login’);”;
}
khabibshahid
July 3, 2019 at 7:08 pmThanks for tutorial, it’s worked!
But could you help to advice, if we need change decimal of CardID= Value to HEX?
cedcraftscodes
July 3, 2019 at 9:10 pmYou can modify the code to output the value to HEX. The if statement help to display leading zero at the beginning.
      String code="";

      for (byte i = 0; i < mfrc522.uid.size; i++){

        if (mfrc522.uid.uidByte[i] < 0x10){
            code += "0";
        }
        code += String(mfrc522.uid.uidByte[i], HEX);

      }
azinu23
July 14, 2019 at 12:56 pmHow to cope with errors “Error compiling for board NodeMCU 1.0 (ESP-12E Module)” ???
cedcraftscodes
July 14, 2019 at 7:24 pmI think that error is a false positive. Try to compile and upload the code again. If it doesn’t work, make sure you selected the correct board for your NodeMcu 🙂
evanz1234
July 29, 2019 at 11:11 pmI encountered the same error, I tried to compile and upload the code again but it gave me the same error. I also selected the NODE MCU 0.9 ( ESP12- Module) and NODE MCU 1.0 ( ESP12- Module) board but it didn’t work. Same error occured
cedcraftscodes
July 30, 2019 at 8:10 pmHello, please go to “Tools -> Boards -> Board manager”. Search for “Esp8266” and install a lower version, then try to re-upload the codes.
intelij
July 22, 2019 at 5:33 amGreat tutorial, I am a newbie just stumbled upon your tutorial. Do you have the same tutorial but using GSM module/sim card to send a text instead? Also may i ask what devices I would need to have a similar setup, I do see the listing under requirements? Is there a standard kit i can purchase to archive this or i have to search for all these from different vendors? Any pointers will be greatly appreciated. Thank you in advance.
papi fake
July 25, 2019 at 12:02 amHello there, I have a request.
How do you fetch data from the database whilst scanning a rfid card.
I mean, I have an idea that involves a vb studio program that fetch a data from a database (I don’t know which you like to recommend whether sql or oracle) while scanning it using a rfid card.
So if you could. Please help me.
cedcraftscodes
July 30, 2019 at 8:12 pmHello, can you send me a flow chart at [email protected]
Or message our Facebook page
https://www.facebook.com/itcstuts/
Thanks!
rizqi007
August 13, 2019 at 3:07 pmHi CEDCRAFTSCODES, its a great tutorial, its helpfull to understood abaut connect rfid to php, thanks
I want to ask you, i have idea to link rfid code with database, so when rfid scan with nodemcu, form on local host call database i have made. what should i do? change arduino program or sql program?
sorry for my grammar
cedcraftscodes
August 18, 2019 at 9:35 amI would like to clarify what you want to achieve.
If you want to display their name/time they logged on a screen or LCD 7 segments display you just need to change the return of server into a JSON or XML that contains the information about the RFID. e.g. response {rifid: 1510965, name: “cedcraftscodes”, datetime: “02/13/2019 7:30 AM”}, your Nodemcu module will then parse the response and display it to user.
If you just want to store those ids in Nodemcu, just make a request to your server/rest API which outputs the RFID codes, store it in NodeMCU Spiffs. When the user scans, fetch data in SPIFFS.
Juank
September 13, 2019 at 12:25 pmHello friend, I need help, I have assembled the circuit and compiled the code, but when you pass the card through the reader the green LED does not turn on and does not send the data to mysql. I already checked the connections and everything seems fine, any suggestions? Thank you.
cedcraftscodes
September 15, 2019 at 5:07 amFirst, you have to debug per module. Start with RFID, check if RFID module works fine by outputting the card tag in serial monitor. Next, check if your Nodemcu is connected to wifi by checking your router’s connected clients. Then check if it has an active internet connection. For the LED lights, check if your led is connected properly and is not burnt out.
JUANK
September 15, 2019 at 10:14 amThank you for your response, he verified the following:
The Wi-Fi connection of the nodemcu is successful because a message appears on the serial monitor and the assigned IP:
Connected to WIFI JUANK
IP Address: 192.168.0.9
But when passing a card, the monitor does not show any message, verified the wiring 3 times and everything seems to be fine, tested the RFID with another code to read the cards and works correctly, also modified the baud but without success, with a tester verified continuity and everything is correct, the LEDs are working correctly.
I am attentive to your response, I would also like to know if there is any way to contact you privately to buy your services.
Finally forgive my English, I use a translator, thanks.
Aldy
September 20, 2019 at 1:33 amHi, can you help me.
Why every time tags place to rfid always show -1 on serial monitor
Connected to Aldy
IP address: 192.168.34.020
-1
-1
and why when me open browser, log.php nothing happened just blank. Thank you
cedcraftscodes
September 22, 2019 at 12:34 pmYou need to host the php files and database in an Apache Server with Mysql. You may want to study PHP and Mysql first.
Cecil Paul
October 1, 2019 at 7:45 pmMy code is
#include
#include
#include
#include
#define SS_PIN D4
#define RST_PIN D2
#define ERROR_PIN D0
#define SUCCESS_PIN D1
#define CONN_PIN D8
const char *ssid = “Tenda_5163E8”;
const char *password = “VAZHITHALA”;
MFRC522 mfrc522(SS_PIN, RST_PIN);
void setup() {
delay(1000);
Serial.begin(115200);
WiFi.mode(WIFI_OFF);
delay(1000);
WiFi.mode(WIFI_STA);
WiFi.begin(ssid, password);
Serial.println(“”);
pinMode(CONN_PIN, OUTPUT);
pinMode(SUCCESS_PIN, OUTPUT);
pinMode(ERROR_PIN, OUTPUT);
Serial.print(“Connecting”);
while (WiFi.status() != WL_CONNECTED) {
delay(500);
Serial.print(“.”);
}
Serial.println(“”);
Serial.print(“Connected to “);
Serial.println(ssid);
Serial.print(“IP address: “);
Serial.println(WiFi.localIP());
SPI.begin();
mfrc522.PCD_Init();
}
void sendRfidLog(long cardId) {
if(WiFi.status() == WL_CONNECTED) {
HTTPClient http;
String postData = “cardid=” + String(cardId) + “&action=insertRfIdLog”;
http.begin(“https://edukites.online/rfid/log.php”);
http.addHeader(“Content-Type”, “application/x-www-form-urlencoded”);
int httpCode = http.POST(postData);
String payload = http.getString();
Serial.println(httpCode);
Serial.println(payload);
Serial.println(“test”);
if(payload.equals(“success”)) {
digitalWrite(SUCCESS_PIN, HIGH);
} else {
digitalWrite(ERROR_PIN, HIGH);
}
http.end();
}
}
void toggleConnStat() {
if(WiFi.status() == WL_CONNECTED) {
digitalWrite(CONN_PIN, HIGH);
} else {
digitalWrite(CONN_PIN, LOW);
}
}
void loop() {
sendRfidLog(12345678901);
if ( mfrc522.PICC_IsNewCardPresent()){
Serial.print(“card is present”);
if ( mfrc522.PICC_ReadCardSerial()){
long code=0;
for (byte i = 0; i
17:12:54.946 -> Connecting………….
17:13:01.443 -> Connected to Tenda_5163E8
17:13:01.443 -> IP address: 192.168.0.100
17:13:01.609 -> -1
17:13:01.609 ->
17:13:01.609 -> test
17:13:21.597 -> -1
17:13:21.597 ->
17:13:21.597 -> test
The data is not posted to the database
cedcraftscodes
October 1, 2019 at 9:13 pmHello, Please check if you can send post request to your host with form parameters of cardid and action=insertRfIdLog. You can use Curl or Postman to emulate sending http post request.
Cecil Paul
October 1, 2019 at 9:35 pmI checked with postman and is working fine. Not even RFID reads
if ( mfrc522.PICC_IsNewCardPresent()){
} this is not executed.
Daniel Acosta
October 18, 2019 at 2:15 amI have this error and I dont know why :c
Arduino:1.8.9 (Windows Store 1.8.21.0) (Windows 10), Tarjeta:”NodeMCU 1.0 (ESP-12E Module), 80 MHz, Flash, Disabled, 4M (no SPIFFS), v2 Lower Memory, Disabled, None, Only Sketch, 115200″
In file included from C:\Users\Daniel\Documents\ArduinoData\packages\esp8266\hardware\esp8266\2.5.0\libraries\ESP8266WiFi\src/ESP8266WiFi.h:40:0,
from C:\Users\Daniel\Desktop\accseso_expertfect\RFID_and_Node_MCU\RFID_and_Node_MCU.ino:4:
C:\Users\Daniel\Documents\ArduinoData\packages\esp8266\hardware\esp8266\2.5.0\libraries\ESP8266WiFi\src/WiFiServer.h:52:14: error: invalid abstract return type for member function ‘WiFiClient WiFiServer::available(uint8_t*)’
WiFiClient available(uint8_t* status = NULL);
^
In file included from C:\Users\Daniel\Documents\ArduinoData\packages\esp8266\hardware\esp8266\2.5.0\libraries\ESP8266HTTPClient\src/ESP8266HTTPClient.h:36:0,
from C:\Users\Daniel\Desktop\accseso_expertfect\RFID_and_Node_MCU\RFID_and_Node_MCU.ino:3:
C:\Program Files\WindowsApps\ArduinoLLC.ArduinoIDE_1.8.21.0_x86__mdqgnx93n4wtt\libraries\WiFi\src/WiFiClient.h:27:7: note: because the following virtual functions are pure within ‘WiFiClient’:
class WiFiClient : public Client {
^
In file included from C:\Program Files\WindowsApps\ArduinoLLC.ArduinoIDE_1.8.21.0_x86__mdqgnx93n4wtt\libraries\WiFi\src/WiFiClient.h:24:0,
from C:\Users\Daniel\Documents\ArduinoData\packages\esp8266\hardware\esp8266\2.5.0\libraries\ESP8266HTTPClient\src/ESP8266HTTPClient.h:36,
from C:\Users\Daniel\Desktop\accseso_expertfect\RFID_and_Node_MCU\RFID_and_Node_MCU.ino:3:
C:\Users\Daniel\Documents\ArduinoData\packages\esp8266\hardware\esp8266\2.5.0\cores\esp8266/Client.h:29:21: note: virtual int Client::connect(const IPAddress&, uint16_t)
virtual int connect(CONST IPAddress& ip, uint16_t port) =0;
^
C:\Users\Daniel\Documents\ArduinoData\packages\esp8266\hardware\esp8266\2.5.0\cores\esp8266/Client.h:37:22: note: virtual bool Client::flush(unsigned int)
virtual bool flush(unsigned int maxWaitMs = 0) = 0;
^
C:\Users\Daniel\Documents\ArduinoData\packages\esp8266\hardware\esp8266\2.5.0\cores\esp8266/Client.h:38:22: note: virtual bool Client::stop(unsigned int)
virtual bool stop(unsigned int maxWaitMs = 0) = 0;
^
In file included from C:\Users\Daniel\Documents\ArduinoData\packages\esp8266\hardware\esp8266\2.5.0\libraries\ESP8266WiFi\src/WiFiClientSecure.h:41:0,
from C:\Users\Daniel\Documents\ArduinoData\packages\esp8266\hardware\esp8266\2.5.0\libraries\ESP8266WiFi\src/WiFiServerSecure.h:20,
from C:\Users\Daniel\Documents\ArduinoData\packages\esp8266\hardware\esp8266\2.5.0\libraries\ESP8266WiFi\src/ESP8266WiFi.h:41,
from C:\Users\Daniel\Desktop\accseso_expertfect\RFID_and_Node_MCU\RFID_and_Node_MCU.ino:4:
C:\Users\Daniel\Documents\ArduinoData\packages\esp8266\hardware\esp8266\2.5.0\libraries\ESP8266WiFi\src/WiFiClientSecureBearSSL.h:38:5: error: ‘BearSSL::WiFiClientSecure::~WiFiClientSecure()’ marked override, but does not override
~WiFiClientSecure() override;
^
C:\Users\Daniel\Documents\ArduinoData\packages\esp8266\hardware\esp8266\2.5.0\libraries\ESP8266WiFi\src/WiFiClientSecureBearSSL.h:41:9: error: ‘int BearSSL::WiFiClientSecure::connect(const String&, uint16_t)’ marked override, but does not override
int connect(const String& host, uint16_t port) override;
^
C:\Users\Daniel\Documents\ArduinoData\packages\esp8266\hardware\esp8266\2.5.0\libraries\ESP8266WiFi\src/WiFiClientSecureBearSSL.h:46:12: error: ‘size_t BearSSL::WiFiClientSecure::write_P(const char*, size_t)’ marked override, but does not override
size_t write_P(PGM_P buf, size_t size) override;
^
C:\Users\Daniel\Documents\ArduinoData\packages\esp8266\hardware\esp8266\2.5.0\libraries\ESP8266WiFi\src/WiFiClientSecureBearSSL.h:58:12: error: ‘size_t BearSSL::WiFiClientSecure::peekBytes(uint8_t*, size_t)’ marked override, but does not override
size_t peekBytes(uint8_t *buffer, size_t length) override;
^
Se encontraron varias bibliotecas para “WiFiClient.h”
Usado: C:\Program Files\WindowsApps\ArduinoLLC.ArduinoIDE_1.8.21.0_x86__mdqgnx93n4wtt\libraries\WiFi
No usado: C:\Users\Daniel\Documents\ArduinoData\packages\esp8266\hardware\esp8266\2.5.0\libraries\ESP8266WiFi
exit status 1
Error compilando para la tarjeta NodeMCU 1.0 (ESP-12E Module).
Este informe podría contener más información con
“Mostrar salida detallada durante la compilación”
opción habilitada en Archivo -> Preferencias.
cedcraftscodes
November 23, 2019 at 7:56 pmPlease use a lower version of ESp8266 Board.
hrishi
October 19, 2019 at 8:21 pmFor me only Wifi is getting connected. The rfid scanner is not able to scan the cards. Is there any prerequisite to the code given above. Please help me……
cedcraftscodes
November 23, 2019 at 7:56 pmPlease check the connection of your RFID. You can test your RFID by using the sample RFID codes.
Amar
October 25, 2019 at 2:36 amI am getting -1
I am hosting php and mysql on apache server, what could be wrong?
Amar
October 25, 2019 at 7:17 pmnevermind
If you have apache24 installed, you need to allow it to be accessed throught LAN network.
Go to firewall -> add new rule and make your localhost available in LAN network
Bryan
November 25, 2019 at 5:43 pmHi there,
Can this one able to write also code or data to nfc card and retrieve the stored data once tapped?
Bryan Giray
December 12, 2019 at 2:32 pmHi,
Im interested with what you did. Let me know the pricing of this one and if you can able to connect it with web based system.
Thank you!
cedcraftscodes
December 25, 2019 at 5:57 pmHi Bryan,
Please send me an email at [email protected]. Let’s discuss. Thanks.
andres
December 28, 2019 at 3:38 pmHi Sir, how can i download your source? Thank you
Adnan Khan
January 20, 2020 at 3:13 pmHow will this system/code perform if we have lets say a thousand RFID Scanners connected via Wifi to a local server?
Sweta
January 30, 2020 at 4:41 pmHi sir!
Sir, we need your help for the above code.
Jerry Nicole Fontanilla
February 21, 2020 at 6:22 amCan’t send data . Showing -1. I’m using XAMP version 3.2.4 in Windows 10 . Can you help me please ?
cedcraftscodes
February 22, 2020 at 10:42 amPlease check the URL of your webserver!
fauzanazly12
March 7, 2020 at 7:23 pmhow to add name in database and viewlogs ??
samfaat
March 25, 2020 at 11:50 amHi sir,I want to know why my viewlogs.php will show this Connection failed: SQLSTATE[HY000] [1045] Access denied for user ‘sam’@’localhost’ (using password: YES)
Notice: Undefined variable: conn in /var/www/html/sam/log.php on line 36
Fatal error: Uncaught Error: Call to a member function query() on null in /var/www/html/sam/log.php:36 Stack trace: #0 /var/www/html/sam/log.php(10): showLogs() #1 {main} thrown in /var/www/html/sam/log.php on line 36
my servername username password dbname all is correct,also i have add the SQL file on phpmyadmin so i want to know what problem is it?hope you can help me and this is my email:[email protected]
bar
May 27, 2022 at 4:39 pm2 years later, same problem here…
SebiF
June 6, 2020 at 10:29 amHi,
this was my first ESP8266 (or even Arduino-) project. Had to refresh my soldering skills for the LEDs and the resistors, but everything worked like a charm from the beginning.
I afterwards tried to use D3 for an old PC speaker/buzzer and used GND from the bottom right side of the board, however, it seems the board refuses to boot when it is connected (code doesn’t matter). Any ideas?
Thank you!
SebiF
June 10, 2020 at 5:43 amOkay, I found the solution. It seems the buzzer didn’t work on D3, because its resistance is too low, pulling D3 to ground, thus making the NodeMCU stuck in flash mode. Booting first and connecting it afterwards worked. So I switched the red LED (in series with a 1 kOhm resistor) from D0 with the buzzer on D3 and now it works. Thank you again for your nice project.
Quentin
June 18, 2020 at 11:33 pmHello, I cannot download the sourcecode from your url. I got a Forbidden error. Could you please help me to solve this problem ? Thank you
Arabindo
July 2, 2020 at 1:41 amHi cedcraftscodes,
I am unable to download the code from the given link. Could you please share me the proper link. Thanks!
Andres Sierra
April 2, 2021 at 10:06 amGood night friend, your contribution is very good and I would like to know how I can do so that with the reading that I receive in log.php a query is made in mysql and not an insert, thanks for your collaboration
Armando
April 27, 2021 at 12:04 amPor favor me puede ayudar, quiero almacenar el código RFID directamente al excel
Gabriel
July 12, 2021 at 6:50 pmThere is any way to only register if the rfid card is alredy in database?
D E S I R E I N D S
October 22, 2021 at 12:37 amIn function ‘void sendRfidLog(long int)’,
inlined from ‘void sendRfidLog(long int)’ at E:\assam work\RFID_and_Node_MCU\RFID_and_Node_MCU.ino:47:6:
RFID_and_Node_MCU:52:16: error: call to ‘HTTPClient::begin’ declared with attribute error: obsolete API, use ::begin(WiFiClient, url)
52 | http.begin (“http://www.ggudmara.com/rfid/log.php”);
| ~~~~~~~~~~~^~~~~~~~~~~~~~~~~~~~~~~~~~~~~~~~~~~~~~~~
Multiple libraries were found for “WiFiClient.h”
Used: C:\Users\Souradeep’s\AppData\Local\Arduino15\packages\esp8266\hardware\esp8266\3.0.2\libraries\ESP8266WiFi
Not used: C:\Program Files (x86)\Arduino\libraries\WiFi
exit status 1
call to ‘HTTPClient::begin’ declared with attribute error: obsolete API, use ::begin(WiFiClient, url)
please help me. im facing this error
D E S I R E I N D S
October 22, 2021 at 12:38 amIn function ‘void sendRfidLog(long int)’,
inlined from ‘void sendRfidLog(long int)’ at E:\assam work\RFID_and_Node_MCU\RFID_and_Node_MCU.ino:47:6:
RFID_and_Node_MCU:52:16: error: call to ‘HTTPClient::begin’ declared with attribute error: obsolete API, use ::begin(WiFiClient, url)
52 | http.begin (“http://www.ggudmara.com/rfid/log.php”);
| ~~~~~~~~~~~^~~~~~~~~~~~~~~~~~~~~~~~~~~~~~~~~~~~~~~~
Multiple libraries were found for “WiFiClient.h”
Used: C:\Users\Souradeep’s\AppData\Local\Arduino15\packages\esp8266\hardware\esp8266\3.0.2\libraries\ESP8266WiFi
Not used: C:\Program Files (x86)\Arduino\libraries\WiFi
exit status 1
call to ‘HTTPClient::begin’ declared with attribute error: obsolete API, use ::begin(WiFiClient, url)